Skype Ends Desktop API Support Affecting Cloud Video Providers

I thought this was an interesting change made by Skype in January. I see little mention of it on the Web. Blue Jeans has Skype still listed as a endpoint but their knowledge base refers to using the browser instead. See screenshot.

This poses an interesting question assuming that Skype is a dominate consumer video platform, if domination is the path to interoperability what happens when the dominate player changes their API and no one else can play? A while back Kevin Kieller from nojitter.com suggested the path to interoperability is through market domination but I am not sure this is what customers had in mind. Maybe the reason I see little traffic on the topic is because it had little to no affect on what company's are doing although I am betting it was used as a selling point.

If you’re a Blue Jeans or other cloud video MCU customer has it affected you?

http://www.nojitter.com/post/232200411/market-dominance-as-a-path-to-interoperability

 image

image

VoIPNorm

Setting up the Cisco SX20 PrecisionHD 1080p 2.5x Camera

Most people are probably well aware of the SX20 series codecs but very few might know about some of the camera options that exist for it. The PrecisionHD 2.5x is a fairly new option that has been available for less than a year. I thought since I have one for testing I would take a closer look at the camera and put together some helpful info in a post.

Below is the typical mounting option for the 2.5x camera:


image


Below are some high level spec’s:

image

Here are a few high level points around the SX20 cameras in general and also more specifically the 2.5x camera:

  • All of the SX20 cameras can be mounted right-side up or upside down.
  • The 12x and 2.5x cameras will auto-sense when mounted upside down, and will automatically invert the image and reverse pan and tilt. (A camera reboot is required.)
  • The 4xS2 camera does not auto-sense. Instead, use the web interface, API, or TRC5 remote control to change the settings:

xConfiguration Cameras Camera 1 Flip: <Auto/Off/On>

  • The cameras should always be mounted level – not pointing up or down.
  • The SX20 camera – 12x, 4x, or 2.5x – will automatically upgrade if a new software image is available after upgrading the SX20

Camera Use Case

Project Workplace has a good depiction of the use case for this camera. See link below:

http://www.cisco.com/assets/sol/tp/workplace_app/index.html?page=scenario&city=sydney&room=3/

Typically this camera would serve a much smaller room space. The good thing with the mounting option is that it puts the camera closer to eye level which improves the viewers perspective of where your looking. It gives the feeling of eye to eye contact.

image

Camera Mounting

Below is the setup for mounting the camera.It is a pretty easy setup once you understand that optimal mounting is upside down!

image

I took a few close ups of the camera and how I have it positioned. My setup isn't perfect due to my screen size but with a larger screen positioning the camera would have been easier.

image

image

image


Setup Tips

The following applies to setting up the SX20 with any camera using the web interface, API, or remote control menus:

Optimal Definition Profile: default is Medium (SX20 only)

  • In poor lighting, set this value to Normal,
  • With excellent lighting, set this value to High. This will increase the resolution at a given bandwidth

Controlling the frame rate: This value controls when the codec will transmit 60fps, rather than 30fps

  • If you want to transmit 720p60, change this setting to 1280_720c
  • If you want to transmit 1080p60, leave this setting at default
  • If you want to transmit only 30fps at all times, change to “Never”

See the screenshot below of these settings:

image

USB Port use

The USB port is currently not in use. This feature is planned for a future release (per the release notes).

Premium Resolution Option Key:

Premium resolution is an option key that is available when you purchase the SX20.

  • Required for transmit and receive resolutions higher than 720p30
  • 576p60, 720p60, 1080p30, and 1080p60 all require the PR option key.
  • Locally displayed resolutions are not affected by this option key. The SX20 can display up to 1080p60 locally.

TC 7 Release Notes

http://www.cisco.com/c/dam/en/us/td/docs/telepresence/endpoint/software/tc7/release_notes/tc-software-release-notes-tc7.pdf

PrecisionHD Camera data sheet

http://www.cisco.com/c/en/us/products/collateral/collaboration-endpoints/telepresence-precisionhd-cameras/data_sheet_c78-669051.html

Project Workplace

http://www.cisco.com/assets/sol/tp/workplace_app/index.html?page=home/

VoIPNorm

Video: Sharing Content with Intelligent Proximity

If you haven't seen a demo of Intelligent Proximity on a Cisco TelePresence endpoint it is well worth the time to check it out. See more below:

Intelligent Proximity

Here are some other new video’s on TelePresence features:

Extension Mobility TelePresence
Speaker Track 60
MX300 G2

VoIPNorm

Cisco TelePresence TC7.0 Web Snapshots for Video and Touch Panel

This is a little tricky but plenty easy to do once you know how. The TC7 software that is used with Cisco’s TelePresence endpoints is a little different than previous versions. Firstly you can only turn on Web Snapshots using the On Screen Display (OSD) for security reasons on the SX20 so you will need the remote. If you have a touch panel you may need to turn it off for a few moments to turn this feature on using the remote. Previously you could use the touch panel or remote to turn this feature on but in TC7 it is only enabled via the OSD. Other C series codecs still allow the touch panel or remote to be used to turn on this feature with TC7.
Turning on Snapshot on the SX20
Using the OSD on the SX20 go to the Advanced configuration menu, navigate to Video > AllowWebSnapshots and choose On.
Turning on Snapshot on the C40/60 Series using the Touch Panel
Open the Settings menu on the Touch controller and tap Administrator. You have to log in with an administrator user name and password to get access to the Administrator menu.
Tap Web Snapshots and choose ON
Using Snapshots
Once enabled the AllowWebSnapshots option in the Web interface will show on. Go to Configuration>System Configuration>Video in the web interface to find this setting. See below:
image
Once Snapshots is enabled you should see what's being streamed from the camera and also what being presented, in this case from an SX20 in the web interface.
image
To get a snapshot of the touch panel the touch panel must be connected directly to the codec over the second Ethernet port, or directly through a touch panel port such as with EX90 etc. So the SX20 as an example does not support this feature since the touch panel connects over an external Ethernet port. The screenshots below are from a Profile system that has a C90 Codec.
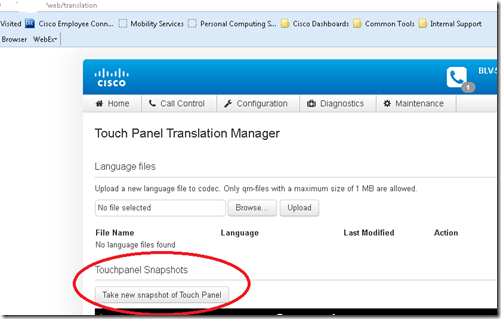
To get to the correct web interface screen use the following URL
https://<Your codec IP>/web/translation
image
Use the “Take new snapshot of Touch Panel” button to grab a screen shot of what's being displayed on the touch panel.
image
From there you can right click on the image and save as.
image
Update
For TC5.1 from the codec’s web interface you will be able to take screenshots of the Touch interface. Short description:
http://<codec ip address>/wsgi/translation
Here are the steps to take screenshots:
  1. Enable web snapshots in the menu (Touch or OSD menu). By design, enabling web snapshots is not possible on web. This is mainly a security feature to ensure that remote users can’t do this.
  2. Logon to the web interface: http://<codec ip addr>
  3. Enter /translation after the IP address i.e. http://<codec ip addr>/wsgi/translation
  4. Migrate on the Touch device to the desired menu and click the “Take snapshot of Touch Panel” button
  5. Right click on the graphic and “Save Picture as”
Hope this help someone (Adam, you know who you are:)).
VoIPNorm