CE-Deploy 3.0 Updates

Time for  a quick update on CE-Deploy after the holiday's. The last few months have been a very productive time as I have added a bunch of new features. I have also had a name change to CE-Deploy 3.0 versus sticking with Cloudy CE-Deploy as a separate app.

 CE-Deploy 3.0 will have both cloud and local admin account functionality built in. This means  you will be able to configure cloud based devices through the cloud xAPI (Command and Status for now) and also on-premise and cloud through local admin access directly on the device. See the screenshot above of local admin device access. 

Along with porting all local admin device functions over to the 3.0 application I have also added the ability to do free form xAPI commands for local admin. This should be really helpful when testing commands or just doing some configuration that you need to bulk deploy in a pinch. Recently I had a customer that needed to do bulk reboots of endpoints. This worked a treat.

A list of the new things I have added recently:
  • Local and Cloud in one tool.
  • OBTP simulator for local devices
  • Integrations settings so you can use your own cloud integration (still testing) for cloud xAPI
  • Cloud xAPI branding and wallpaper deployment (that's right wallpaper!)
  • Endpoint restore using a backup file for local admin
  • Single endpoint deployment(no need to use a CSV of IP addresses for one device)
  • Create CSV for of device ID's for cloud
  • Better messaging in the message console and logging of errors
  • Error reports(coming in the next build).
That's it for now.

VoIPNorm


Cloudy CE Deploy Update

Just a quick update on Cloudy CE-Deploy. 

One thing I noticed missing from the original CE-Deploy application was the ability to guide the user through the settings and not giving any feedback. This time around I am adding some new features that help admins work out what fields are needed to deploy. Basic UI features like tool tips, alerts and notifications. The cool part is that many of these features are easily enabled and controlled with Electron. I have come to appreciate what Electron and Bootstrap have available to make better applications. 


Features to date:
  • Oauth Webex Integration
  • Deploying a command or status via cloud xAPI
  • Use CSV of device ID's, individual Org ID, Tag or device ID to deploy to either lots of devices or just one
  • UI updates to include future supported features like Macro upload
  • Alerting user to missing information
  • OS notifications on deployment completion
  • Message console display to provide deployment information in progress versus having to refer to logs after the fact.
As the application gets closer to completion I will post up on Github as a public repository. This time around its based on the Electron Boilerplate. This has all the tools already built in to get a Electron project moving. Unfortuniatly some of the features I wanted to include like deploying a macro will not be available on first release due to API limitations but in time will come.

If you want to know more about this application come and join the conversation on Webex Teams here: https://eurl.io/#SJWfk6qUV


VoIPNorm


Video: CE Macro Timer

If you haven't seen the Youtube Webex Channel you really should. Richard Bayes, who appears in the video below, posts regular content on CE related topics. It's well worth a look. This week Richard is covering a timer Macro which can be handy in all sorts of situations.


I have been busy this week creating Cloudy CE-Deploy but will post an update on progress next week. UI is nearly done.

VoIPNorm

Cloudy CE-Deploy, Still Cloudy!

Cloud, cloud, cloud, it's all I hear about these days. Well, I thought it was time to join the ranks. Below is a screenshot of some of the work I am doing on a Cloudy CE-Deploy that will take advantage of the new Webex devices cloud XAPI. While I could incorporate this into CE-Deploy, I thought it a great time to do some clean up and investigate a better Electron boilerplate than I had been using. This is after all my second Electron app. Initially Cloudy will allow personal token use but Webex integrations with oauth support as the final goal.


Raw XAPI command processing is the main feature right now but open to other suggestions. Comment below.

Not familiar with CE-Deploy check this out.

VoIPNorm

Cisco Video Endpoint ServiceNow Integration

Ever wanted a way to allow users to create a ServiceNow ticket straight from the video room endpoint? Well you can. Using Macros and the new HTTP Post capabilities in CE9.7+, integrating to ServiceNow to raise a incident report is pretty straight forward. It has to be as I did it on my own endpoint!

In this post I am going to step through the UI and the macro in the order that stuff happens so hopefully it will explain how this all works together. Sometimes it is difficult to understand how code, UI interactions and the backend all work together. This should help layout exactly how it all works together to give a custom process flow to create a new ServiceNow Incident ticket.

Stepping through the UI, Macro and ServiceNow


The macro work has largely been done for us. This sample macro posted on DevNet's Github repository is a great starting point to build the process you want users to follow. The Touch 10 panel that gets created in the UI creation tool is nothing more than a simple button. Most of the actual work that gets done is by the macro. The macro is providing the logic for the screen/panel that is presented next in the flow based on the users selection. Finally the Macro posts the ticket number created by ServiceNow on conclusion of the process and presents the user with the incident number. Let's take a look at some of the more important sections of the macro to get a sense of what is happening.

Our process starts with the Touch 10 panel. The Report Issue button is nothing more than a button in the UI configuration tool.

Below is the In-Room Configuration tool view of the button. The button Id is "reportissue" which our Macro will use to identify which button was pressed.


Let us step through how it all works.

Step 1. The "Report Issue" button is pressed.


This step in turn generates an event by the codec we have subscribed to using the code below. In line 2 we identify the correct panel using the panel Id 'reportissue'. This goes on to launch the next UI element to the user.
--Script--
--Script--
Below is the multichoice menu our user is presented with based on the "UserInterface Message Prompt Display" options.


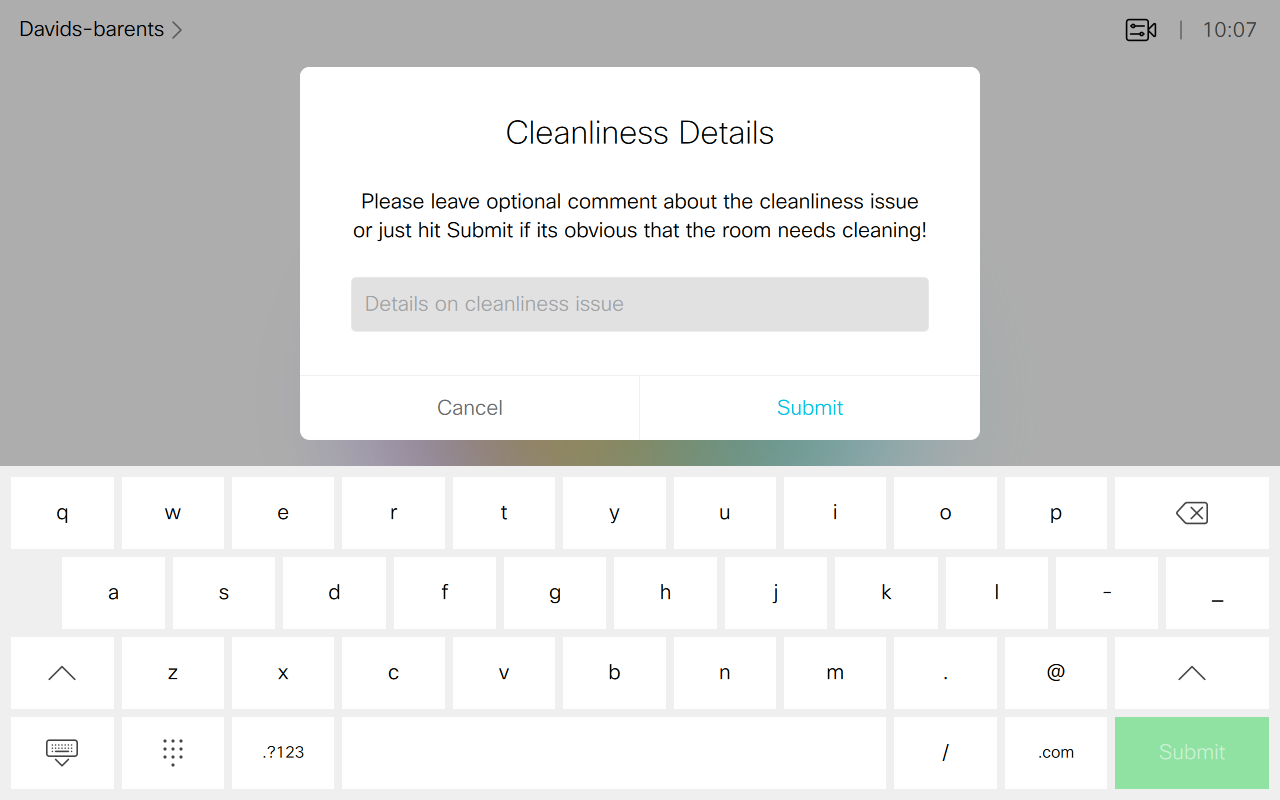
Step 2. Multichoice option selected.


Assuming our user has selected cleanliness as the issue, the feedbackId generated by that event is 1. The macro using the "UserInterface Message TextInput Display" command on line 6 after matching case '1' in the switch command generates the next step.

--Script--

--Script--

The user is given the option to add more details and submit the incident.


Step 3. Post Incident Ticket to ServiceNow on Submit.


When the user hits the "Submit" button the raiseTicket function is called which in turn calls the getSericeNowIncidentIdFromUrl function which is used to retrieve the ticket ID to post back to the user. Both of these functions rely on the new HTTP GET and POST features in CE 9.7+.

--Script--
--Script--
The users view of the ticket number. Although this is a practical way to show the user the ticket was indeed placed, the user now has to write this sucker down. An improvement on this script is to somehow automate getting this ticket number to the user, Webex Teams perhaps!


Here is our new incident ticket in the ServiceNow portal. So proud.


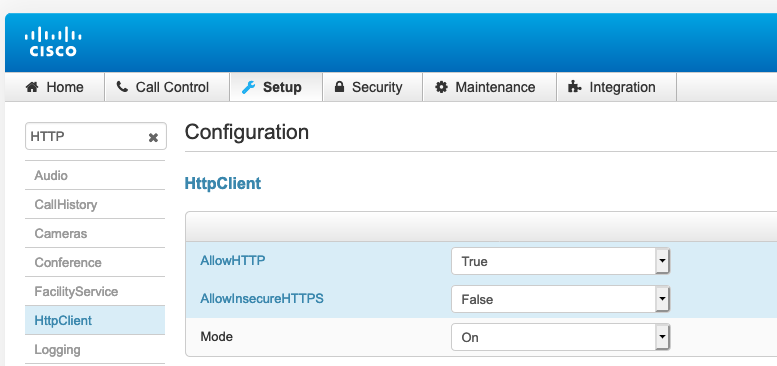
While running this as a Macro is pretty neato, running this as a server based application may provide more opportunities to add additional functions like emailing the user after they submit the ticket. In the macro above we are also using insecure https. This might be frowned upon by some security folks so using a server based version of this might help with additional security features like more secure https perhaps.

Something else to consider is what data you collect before you raise the ticket. Below is a snippet to grab the call details of the last call made. Once you have this you can add it to the ticket on the initial post. Other details like CE version, system name, IP address might also be worthy of collecting for the ticket to lower the amount of time someone has to spend manually collecting that data.

--Script--
--Script--

If your interested in building a server version of this project, I have a starter project you can check out at https://github.com/voipnorm/CESeNow. This project is a bit of a combo project as it has some additional code for pulling people presence and other data from an endpoint but all the code required to do this integration is incorporated. If you just want to take a look at the code the endpoint.js file is doing all the work.

For ServiceNow developer instance setup head to: https://developer.servicenow.com/app.do#!/home. Your developer instance is available for 10 days with no activity. Just be aware if it goes to sleep that reinitiating the instance may produce a different URL that you will need to update and may require a password update. Your password username combo has to be base 64 encoded so this will need to be updated as well.

This is a interesting project to put together and best of all it doesn't cost a dime. ServiceNow developer instances are free, you just need to sign up to their developer portal.

VoIPNorm

CE-Deploy Update - Disable Webex Assistant

If your not familiar with the CE-Deploy, check this out first:

http://voipnorm.blogspot.com/2019/07/ce-deploy-for-cisco-collaboration.html

Now for the update.

Recently I had a customer that wanted to test the Webex Assistant on their endpoints but as you probably know by now, when you enable the assistant all endpoint are enabled. There is no way currently to selectively disable it in bulk. The only way is via the API or on the endpoint web admin portal. With this update to CE-Deploy you can now bulk disable the assistant on an endpoint but still leave the setting available on the Touch 10 to be enabled later. There is a setting to remove the Touch 10 setting altogether but that may be for something down the road.


If your interested in trying CE-Deploy please let me know in the comments below or PM me on Twitter @voipnorm.

VoIPNorm

Making an Online Meeting Button for Cisco Video Endpoints

If you have seen the latest update for Webex Room Kit you would have noticed the "Join Webex" button on the Touch 10 screen. It's a nice add and brings together Cisco endpoints and meetings even further. But if you are like the companies I work with this button has its limitations. Firstly, it only allows you to join scheduled meetings with a meeting ID, so PMR's won't work. Secondly its only for joining a Webex. For some companies I am sure this won't present a problem and those restrictions won't matter but for most it lessens the value of this button. I would go as far as to say most companies should probably hide this button as it only makes yet another method to join a meeting thats limited to just one use case. What we really need is something more universal.

So how do we make a join button that makes it easier for users? We cannot account for every variation and conferencing service out there but we can look at what users might join and try to predict the most likely use cases. We can also look at what happens when they get it wrong and how we can help users move forward dialing the right URI or number.

Lets say, your company has Webex, likes using PMR but also uses scheduled meetings. We know that most users only join their own company meetings but occasionally they will want to join another companies meetings possibly on another service like Zoom. We can therefore say with certainty the main use case we want to ensure works is joining your own company meetings. Secondly we want a way to ensure it worked, the user was happy and if it didn't let's give them some help.

The flow is something along the lines of (please excuse my lack of drawing talent, this is as good as it gets):


In the Touch 10 below I hide the Call button. This make just one path to dialing a online meeting. The green "Online Meeting" button. This does however remove access to address book lookups. Not sure about you but last time I tried a address book lookup on a video endpoint it was not easy. 99% of your users would struggle with it so lets get rid of the confusion. If you want a simple call button, I would suggest make your own and call it Audio Call with only a numeric keypad. Forget favorites and recents to, make it simple.

Once the online meeting button is pressed we present an input panel so users can input a alphanumeric or numeric meeting ID or a full URI. Some users may be comfortable entering a full URI so we don't want to ignore that they may do this.
Our acceptable formats are:
  • 9 digit number for a standard schedule Webex meeting. This appends "@webex.com" and the assumption is it could be destined for our site or another companies Webex site.
  • Alphanumerical for personal meeting room. This is appended with "@yoursite.webex.com". PMR URI's require a sitename in the domain but don't worry if it's another companies we can address it after rejection.
  • Full URI. Any standard URI format such as bob@bjn.com.


Once the user hits join the call with either go through or is rejected. If it's rejected its more than likely they are looking at the touch panel to see what went wrong or redial. On disconnect we can present the user with a survey style question and see what happened. If the meeting ID was rejected there are a few reasons why this might happen.
  • Meeting ID was an invalid Webex meeting ID
  • Meeting ID or URI was mistyped but the user has a valid ID/URI
  • The user is typing in a valid meeting ID for another service like Zoom but didn't enter the full URI just the meeting ID

We could adjust our macro to deal a little better with guessing the different conferencing services and append the right domain but we will always have some overlap. As an example, Webex uses a 9 digit scheduled meeting ID and BlueJeans can have a 9-18 digit ID. Zoom can also have a 9, 10 or 11-digit number. The 9-digit number is used for instant, scheduled or recurring meeting. The 10, or 11-digit number is used for Personal Meeting IDs. So we can attempt to guess what conferencing service a user is trying to get to but it will never be perfect. Our best scenario is pick what is used most often and try to accommodate it. If what we pick is not what they are trying to reach and the call is rejected we can guide them how to reach their meeting destination. 

A much more complicated user experience would be to have a button on the touch panel for each different conferencing platform. That is apart from somewhat lazy complicated for the user. The average user will be easily confused with so many choices. A well educated user might be able to discern what button to use but most will not.

In the screenshot below the user has just input a 11 digit meeting ID. We reject it without dialing as it may be just a mistype or they may be looking for another service. Either way the corrective action is now ask the user to enter the full URI. Note the screenshot below shows a numeric keyboard but this would be better being the entire keyboard as now you require the full URI. The code has been adjusted to suit a full keyboard layout.


Below, our user has input a incorrect ID that was an accepted format so we attempted to dial but was rejected. So we give them a choice on disconnect. We could add a 3rd option here to get help as well. Another option here is to review disconnect cause codes and provide a menu based on what caused the disconnect. 


 In our case the user selects Meeting ID was rejected so we guide them to the right format to enter. Hopefully the user can recognise the URI in their meeting invite from the example on the touch screen.


Finally here is the macro to make this all happen.  Remember to build out the macro to match your most desired outcomes such as most relevant meeting service etc.

--Script--
--Script--

VoIPNorm


Project CE Cloud Lighting Part 3 - Touch 10 UI & Nodejs Code

We are starting to get serious now. We have our TP-Link light installed and setup on Kasa. Now we just need some Nodejs code and a Touch 10 UI to finish it off. Our Touch 10 interface looks something like this:


Our focused here is on the lights button. It's pretty simple with a panel pictured below:


I have yet to add the dimmer function in my Nodejs code but built the UI anyway. Seeing as I am the only user of this system, I think that's okay. The On/Off button is a slider which generates an event of 'on' or 'off'. Yep it's that simple.

For my slider I have given it the ID of "office". Now, whenever there is a event fired off the widgetId will be "office".


As with all of the projects involving CE building the UI typically takes less than 10 minutes but it's still fun to build and test them out. For Node code I took a previous project and have just made some adjustments and added some new code.

https://github.com/voipnorm/CEKasa

The CEKasa repo contains 3 files to make the project work. Our .env file to host are passwords and usernames, and the server and endpoint files. The endpoint file is an adaptation of the endpoint file  from https://github.com/voipnorm/CEbusyLightOmega/blob/master/endpoint.js.

What you will notice with the new endpoint file is some lines that are not required are commented out. This is because we will bring all our code together in a later post to build a room controller on our Pi. Now you get it:). I need more material to write about, that's right.

So what's the difference between the two projects you may ask? Well its below. The new monitorWidget function is looking for our Touch 10 events when you move the slider.


--Script--
--Script--

Once it has seen an event it emits its own event to the listener in the server.js file below which fires the light function turning on or off our lights.

--Script--
--Script--


Not a terribly complicated piece of code but it works.

There you have it folks, an inexpensive room light controller. In this project I am only controlling 1 light but this can be expanded to as many lights in the room as you like. I left the dimmer out for now. If you want to have a go, let me know your results in the comments below.

Final thoughts.


This was a fun project to put together. It's also pretty inexpensive with a bulb costing around $20. If you haven't realized already we are building what is a pretty inexpensive room controller using our Webex room system and a Raspberry Pi. A typical room controller system can cost anywhere from $2000 and up and to date we have spent less than $500 if you include the HDMI switcher from a previous project. While this does not include the cost of our room system of course which you would need anyway,  we are just taking full advantage of everything we can do with it combined with our Pi.

Hope your enjoying these project posts. It's a great way to get started programming with Pi, Webex Room devices and Nodejs.

VoIPNorm

Previous posts:

Intro to project:

https://voipnorm.blogspot.com/2019/09/project-ce-cloud-lighting-part-1.html

Working with Kasa cloud:

https://voipnorm.blogspot.com/2019/09/project-ce-cloud-lighting-part-2.html

Project CE Cloud Lighting Part 2 - Working with Kasa Cloud

I thought about creating a whole thing about creating the account and registering the TP-Link light to Kasa but this video belows goes through the app and the lights pretty well.


Okay, this was a little long winded but lon.tv covered the basics. Once you get your lights registered  it should look like the Kasa app pictures below.


Now, on to the more important stuff like how are we going to interact with the bulb. You can directly access the bulb but we are going to access the bulb through the Kasa Cloud. Using the kasa_control nodejs library we are going to access the Kasa cloud and send commands to adjust our light. This assumes you have downloaded the Kasa app, created your account and registered your bulb. Below is some code to get the ID of your bulb. If your like me and have multiple bulbs registered you may have to search through the output to find the correct bulb.

--Script--
--Script--

The output from our node script should be something similar to:
{ fwVer: '1.8.6 Build 180809 Rel.091659',
    deviceName: 'Smart Wi-Fi LED Bulb with Dimmable Light',
    status: 1,
    alias: 'Office',
    deviceType: 'IOT.SMARTBULB',
    appServerUrl: 'https://use1-wap.tplinkcloud.com',
    deviceModel: 'LB100(US)',
    deviceMac: 'deleted',
    role: 0,
    isSameRegion: true,
    hwId: 'deleted',
    fwId: '00000000000000000000000000000000',
    oemId: '264E4E97B2D2B086F289AC1F00B90679',
    deviceId: '8012221C6DAD0B255555555555555558',
    deviceHwVer: '1.0' },
The "deviceId" is what we are looking for. We can now plug this into our code so we can control our light. Next up we can start building our Touch UI and construct the code to finish off our project.

VoIPNorm

Webex Personal Meeting Room with Webex Video Devices

How many times have you heard an Exec say, "I want it to be easy to join my Webex meeting"? Let me guess, a lot. While we would like to think that those in the Exec suite are just like any other set of users this would only be kidding ourselves. They do get special treatment with access to devices and setup's that other users in the organization do not get access to. It's not uncommon for an Exec to have a personal Webex Board or Room 70 device in their office. Customizing to one person seems counter-intuitive to your typical IT departments motto of everyone gets the same build but doing these types of customizations on a Cisco endpoints is easy. Certainly an Exec will find them beneficial and in turn grateful for your expert help.

Key Webex Settings

There are some key settings to take advantage of that while you may not want as the default for all your users it may help those who sit on the top floor. Firstly removing the need to enter a pin when joining from a Cisco Cloud registered video device and also remove the annoying are you the host popup. This setting is part of the Alternate host. In modern view under Webex Meeting - Preferences - My Personal Room - Alternate host: select the following options:

Alternate host settings

This setting will remove both the need to enter a pin and also the "are you the Host" popup when entering a meeting from a video device. It does also mean that people will immediately enter your PMR versus being put into the lobby until you enter. From my interactions with most people though this is a acceptable compromise. The bonus to adjusting the Alternate host setting is now the Webex AI Assistant will launch you directly into your PMR when you are proximity paired and use the phrase, "Okay Webex start my PMR"or "Okay Webex start my personal room".

Since this setting eases some of the restrictions around alternate hosts adding in the Notification - "Notify me by email when someone enters my Personal Room lobby while I am away" and turning on lobby autolock are important. This will let you know if there are people trying to take advantage of this less restrictive setting.

This URL will also help with admin site settings:

https://help.webex.com/en-us/nfgr7ux/Allow-Users-to-Host-Cisco-Webex-Meetings-from-a-Video-Device-Without-a-PIN-in-Cisco-Webex-Site-Administration

Video Device PMR Shortcut

For those of us who maintain a video infrastructure the word customization brings up memories of horror and pain dealing with Crestrons and other 3rd party devices to create a custom environment. While these 3rd party controllers still have their place in our environments a lot of the things we needed them for are now native in Cisco video endpoints. The PMR shortcut is really as simple as we can get from a customization point of view but still it's a very handy setup to know. Let's start with the Touch 10 and through to the Macro.

Touch 10 Chris's Room

This has quite a few buttons but the one we are focused on is "Chris's Room". This is a shortcut to my Webex PMR. The screenshot below might be a little hard to see but I have created a new Panel called Chris's Room and given it a panel ID of "chris-pmr".
Panel Creation
Once this is pushed to your touch 10 and you see it appear on the screen it's time for the Macro.

Through the Macro editor create a new Macro and adjust the code below for your desired PMR string.
--Script--
--Script--
Once you save your new Macro you are done. Your ready to test your new PMR shortcut and delight your Exec with your technical know how.  Word of caution if you are building the shortcut for a Webex Board ensure that your Board has a Touch 10 paired with it. Custom UI elements will not appear on the Board display like the default panels.

If you need some help using Macro's and setting up custom UIs on a Touch 10 for the first time this video while based on Web Apps on a Webex Board should still help:

https://www.youtube.com/watch?v=P5a2DNovvSI

Good luck!

VoIPNorm

Project CE Cloud Lighting Part 1 - Introduction

While this is not the normal way to do conference room light controls with a CE video endpoint, it is an interesting exploration of leveraging IoT devices with CE. It's also an inexpensive project to try if you have a video endpoint available. The price of a TP-Link light bulb is around $20. While you will also need a Raspberry Pi or other compute to run Nodejs its still a super cheap project and you will also save money by switching to a LED lightbulb.

Let's face facts you could just use a light switch with a $1 bulb but where would be the fun in that. You could also spend way more money on a system that does a whole lot more than just controlling the lights but that means $$$$, a lot more than our $20 solution. So if you just want to setup a conference room demo with some bells and whistles this might be an interesting place to start and there is no fussing with any electrical setup, it's all cloud IoT based. I did this setup in my home office using my MAC to do the initial coding and finally moving it over to a Raspberry Pi to keep it running. I also have Alexa setup with the same light. The TP-Link light can have both controlling it and it didn't seem to pose an issue.

So let's get to it.

Introduction

TP-Link makes a series of smart light bulbs. Costs vary on bulb features but for our project I am using the base model TP-LINK 50W Smart Wi-Fi LED Bulb with Dimmable White Light (KB100).  The bulb is configured through a smartphone app called Kasa Smart (A TP-Link spin off company TP-LINK Research America) but we will take a look at that in the next post.

The setup is pictured below. The Room Kit Touch 10 is providing the UI with a Pi in the middle running Nodejs doing the work to instruct our cloud service to turn the light on and off. Like many of  the projects here on the blog I have a Pi running my node code but it could be any compute device capable of running node like a MAC or Windows machine.


In this project we are once again leveraging websockets on the Room Kit to collect the Touch 10 events on our Nodejs server.  Websockets has become my favorite new way to deal with events coming from a remote CE device. In case you were wonder this feature was introduced in CE9.7 and there is good reasons to like it. Check out a post I did recently on different methods to access events remotely:

 http://voipnorm.blogspot.com/2019/07/ce-websocket-v-ssh-v-httpfeedback-which.html


Next post, I will install our TP-Link light and get it working on the Kasa Smart App.

VoIPNorm

Web Apps on Webex Board

If you have not seen the demo yet on how to do this see below:


This is a very cool new feature for Webex Board building upon digital signage. But let's take a closer look at my favorite the Macro. This new feature is enabled by the command "UserInterface WebView Display" which launches the browser on the Webex Board and displays the web app in the URL option provided.

Script used in the demo:

--Script--
--Script--
In Richards case he has used a button on the Webex Board to launch the web app but it could in fact be any function to trigger off the web app. Say at the end of the call you want to run a survey, you could launch a web app. Okay, that would be super annoying maybe you just want failed calls. If you wanted to keep a dashboard constantly up on the Webex Board when not in a call now using a macro you could potentially show any number of different apps using different triggers. So lots of cool stuff that's possible.

Quick tip. If launching a YouTube video use the following format for full screen:

https://youtube.com/embed/video ID goes here?autoplay=1&controls=0

See example script below.

--script--
--script--

VoIPNorm

Project HDMI Switcher Part 4 - HDMI Switch and Final Thoughts

We are coming to end of this project and there are a few final adjustments to make to our HDMI switch. The HDMI switch for this project is the Atlona JUNO 451. This was the cheapest IP controllable switch I could find on Amazon. At just under $400 its not cheap but the alternatives were much closer to the $1000.

JUNO 451
Below are the settings we need to adjust on the switch. If you connecting a PC as one of the inputs ensure that HDCP is turned off. Also make sure to turn off the auto switch as this will now be controlled by our Touch 10.

Switch settings

One last thing to mention if you didn't notice in the previous post we are using HTTP and not HTTPS in control URL for our switch. This does mean enabling HTTP  on your codec. The JUNO switch didn't seem to support HTTPS. I guess a drawback of only being $400.

HTTP enable

Final Thoughts

This was a fun project and fairly easy. I could have covered it in one post but I think it's easier to consume a project over a number of posts and follow along. It is certainly much easier to write.

For the price the Atlona switch is awesome. One problem I ran into was the remote was dead on arrival. While I wasn't to concerned about it, it was a pain in testing that it didn't work. In saying that the project was a success and I use this setup in my home office.

The reason I decided to do project based posts on the blog is to help people find interesting stuff to build. Projects similar to the ones I have been blogging about need not be super intimidating as it first appears. There was really very little code to write and the UI on the Touch 10 was a simple panel with a few buttons.  There is a stark difference between coding sample hello world projects versus having things to build that provide actual value. You learn a great deal faster and and it is way more fun. Also these projects generally require a combination of hardware and software. Welcome to real life people, not every coding project is just a web server.

I hope your enjoying the recent project based posts I have been doing. There are loads more to come.

VoIPNorm

Previous post in the series:


Part 3 - The Macro

Project HDMI Switcher Part 3 - The Macro

This is really where the pedal hits the medal and we start pulling our solution together. But before we get started if you didn't catch the previous posts take a look here:

Part 1 - Introduction

http://voipnorm.blogspot.com/2019/08/project-hdmi-switcher-part-1.html

Part 2 - In-room control

https://voipnorm.blogspot.com/2019/08/project-hdmi-switcher-part-2-touch-10.html

The macro framework on CE based devices (Webex Room Kits and such) as you should hopefully know by now is javascript based. There are two main functions to our script. This first is listenToGui and the second is switchHDMI.  ListenToGui takes input via the events generated by the widgets on the Touch 10 which then calls switchHDMI to send the HTTP GET request to the HDMI Switch IP interface which then switches HDMI inputs. Once you look at the script below you will see just how simple it really is.

--Script--

Your URL if using a different HDMI switch will differ of course but should be documented by the manufacturer if the switch is IP controllable. In my case  the ${source}AVx1 on line 6 is just the id of the widget we created in the last post. By using simple id's to identify each of the inputs we are able to keep our code simple as the HDMI switch uses the same identification to assign input ports.

Next up HDMI switch setup and final thoughts.

VoIPNorm


Project HDMI Switcher Part 2 - Touch 10 Control

If you not familiar with the setup for this project please visit for the introduction.

In part 2 we are going to cover building the Cisco Touch 10 UI for controlling out HDMI switch. This is pretty easy as the UI control involves a button that is available in in and out of calls and the panel to allow selecting different inputs.

In-Room Control Primer

If you are not familiar with building custom interfaces on a Touch 10 controller please check out this primer from the Webex Team I posted recently first. It's a great intro for getting into working with the tools that allow you to create projects just like this one.

Back to the Project...


After accessing the In-Room Control Editor I created a panel and added a 4 button widget. Make sure to select the "Panel is Available Always". You may want to switch HDMI inputs mid-call.

In-Room Panel Creation
Once you have created your panel, select your icon and color for the panel button.
Button icon and color selection
We have our panel selected, our color and icon for the button, let us take a closer look at those widgets. As you can see below it's pretty simple. The ID's are aligned to the inputs on our HDMI switch so not to confuse us. To make it simple the button IDs are 1 - 4. The ID's are super important as this is what the Macros will use to identify what was pressed. Make sure to label the buttons on the widget with what the HDMI selections are.


Simple Button ID

What you end up with is something similar to the screenshots below on the Touch 10. Our switch has a purple button with something that looks switch-ish for the icon.

Button alway available

Widget with button labels

If you would like to upload this as XML here is the XML file you will need:


Next post, we will cover the Macro used to turn the UI into actions to control our Switch.

VoIPNorm

Project HDMI Switcher Part 1 - Introduction

Before the advent of custom UI elements and Macros on the Cisco Touch 10, switching HDMI inputs from a controller was typically done with another third party touch screen that was designed for addressing the room environment. This may or may not have included the video endpoint controls in the room.

Complex conference room
Your conference room may have also looked like the picture posted.  Hopefully you are not dealing with this type environment. Comment below if you are. I typically find organizations that have this type of conference room are struggling with understanding the new capabilities that modern video conference room device can do to reduce complexity.

The HDMI switch example in this post while only a small piece of a puzzle shows how you can start leveraging the Cisco video device in the room to reduce complexity. 

The Project


Below is an overview of what we are trying to achieve. 

Project overview
The Webex Room Kit we will be leveraging the following features:
  • Macros
  • Custom Touch 10 UI
  • HTTP request GET method
Atlona AT-JUNO-451
The HDMI switch for this project is a Atlona AT-JUNO-451 pictured right.  Its around $400 on Amazon and one of the cheapest HDMI switches that is IP controllable. Comment below if you have used other HDMI switches with success.

For our project we need to complete the following steps:
  1. Custom UI inputs on our Touch 10
  2. Codec Macro creation
  3. HDMI switch setup
In the next post we will tackle the custom Touch 10 UI controls to control our switch.

VoIPNorm

Creating Custom User Interfaces for Cisco Touch 10 for Webex Room Devices

One of the big differentiators for Webex Room devices is their ability to create custom experiences. Richard Bayes of Cisco does a great job of running you through one of the most common requests, creating a speed dial for support. This could be a speed dial for just about anything but support is a great use case.


VoIPNorm

Project Busylight Part 3 - Final Thoughts

The final step to completing this project was to get it running on a Raspberry Pi. You may have noticed a few weeks ago I posted some instructions on getting Nodejs and Node-hid running on Raspberry Pi. Well, now you know the reason why :)

Busylight in action. Vader finally found an available conference room.
One of the settings you may need to adjust on your Webex Room Device is PeopleCountOutOfCall. If you wish to show presence of people in the room regardless if they are using your room systems this will need to be enabled. It is a sensitive setting though and if only one person is the room and the camera does not see a face front on it will report 0 people in the room. I have place some code for people presence detection but right now its not changing the color of the light. Some more experimenting is required to see if this works better than people count.

Webex Room Kit setting for People Count out of call:

Project files can be found here: https://github.com/voipnorm/CEbusyLightOmega

Final Thoughts

Another project done. This has been a fun one. The Busylight is a fun low cost project that can get you started with developing with Cisco Video Endpoints and it has potential for huddle spaces with Webex Room Kits. I also set a up Busylight Alpha which is a slightly different device but works with the code I developed with the Omega.

The BL Omega device is a great little light device. Very similar in a lot of ways a the Embrava device but I found the tech and developer support from Plenom a much higher standard. Seems to me Embrava have little interest in developers, which is a shame. This leads me to recommend the Busylight for custom development projects more so than the Embrava product.

The Busylight took next to no time to get up and running with some initial code on my MAC, using a Pi always takes a bit more time. Thanks to the libraries already available on Github it really is a simple project that you could integrate into all sorts of stuff. Don't believe me, then go check it out.

Next project, HDMI switch integration with a webex board. Should be fun.

VoIPNorm

Previous project posts:

Part 1
http://voipnorm.blogspot.com/2019/08/project-busylight-part-1-setup.html

Part 2
http://voipnorm.blogspot.com/2019/08/project-busylight-part-2-nodejs-code.html

Project Busylight Part 2 - Nodejs Code

The adventure continues. This fun little project now has some Javascript running on nodejs and seems to function pretty flawlessly.

I now have four different presence states based on feedback from the Room Kit:
  1. Flashing Red - Do not disturb
  2. Red - On a Call
  3. Blue - Room occupied based on people count
  4. Green - available and empty
The expansion of different presence states was pretty easy. I incorporated people count, do not disturb and the call API's. Do not disturb is a little hard to find on a Cisco Touch 10 so my advice is if you want users to actually use DnD or know its available build a custom UI widget for it. This can be used to toggle DnD via a Macro.

The project was a little larger than expected so I created a github repository to get access to code if your interested.

https://github.com/voipnorm/CEbusyLightOmega

The design is pretty simple. The bl and endpoint files create class's for what you would think they are. The most interesting part of this project was creating a way to prioritise each presence state. What I created is based on the array index of a 4 element array [0,0,0,1]. Each presence state matches the following positions in the array:
  • Flashing Red (DnD) - 0
  • Red (in call) - 1
  • Blue (people present) - 2
  • Green (room is vacant) - 3
As the presence state changes so does the array. [1,0,1,1] means the room has been set to do not disturb and there are people in the room. The busylight shows a flashing red because it has the highest priority. The final element is alway left at 1 because it has the lowest priority default and it's not worth the effort to change. The "let indexColor = colorArray.indexOf(1);" looks up the first element in the array that has been set to 1 dictating what color to set the light.

Next step lets get it running on a Raspberry PI.

VoIPNorm

Project Busylight Part 1 - Setup

It is project time again. This time I am working on a very similar project as the recent Embrava BlyncLight project but using the Kuando Busylight Omega by Plenom. The folks over at Plenom have a great test program to get a Busylight sample to test out for free. For this project I am using the Omega Busylight pictured down below.

Initial Thoughts and Comparisons

Both products, the BlyncLight and Busylight, are similar but there are enough differences to allow you to distinguish the two products pretty easily. One thing I first noticed about the Busylight is that it's not a bright as the BlyncLight. It is more toned down due to the white casing it has. This is not a bad thing though as the BlyncLight could be considered to bright in some environments where the Busylight is less visually disruptive.


Plenom have been receptive to developers writing code to their product. While it was difficult to get Embravas help, Plenom have been phenomenal in helping me get setup with the right info and also releasing the USB API to help develop a node module. In my first take on the project though I am using a library from another developer but with the USB API it should be pretty easy to write my own. In typical nodejs style it is always easier to use something that is already out there first time around.

The busylight nodejs module install also requires node-hid. If you plan to use node-hid on a Raspberry Pi here are some useful instructions to get that running.

Here is a quick overview of the setup:


If you followed along on my previous project this probably seems all to familiar. So, along with using nodejs this time around instead of Python, to spice it up a bit more I am going to add some additional functions like recognising people count to turn the light purple. Now my wife will know I am in the office but not on a call. I am sure she will be impressed. Well, probably not.

Make sure to stick with me this should be a fun little project.

VoIPNorm


Installing Nodejs and node-hid on a Raspberry Pi armv7+

I have done quite a few projects now using the node-hid library with Nodejs. It does require a little work to get up and running on a Raspberry Pi but it is well worth it. In this post I am going to cover the steps for getting it running on a PI mainly to self document as I am forever having to work this out every time I need it. If I used it everyday I would probably remember the steps but it's just long enough between installs that I forget the steps I take. I may come back to this post and edit it from time to time to ensure its correct as I find issues.

What does node-hid do?

Node-hid allows you to access USB HID devices from Nodejs projects. This as you might imagine is very handy. Joysticks, mice, keyboards, busylights to name a few but basically anything you can stick into your USB port that supports the HID standard.

https://github.com/node-hid/node-hid

Below are basic step by step instructions on everything from installing the image on the Pi and installing node to getting node-hid onboard. This is very basic guidance especially the initial installing the OS and node. If you want screenshots and all the rest go to here.

Installing OS on Pi

Step 1. Download Pi Image
https://www.raspberrypi.org/downloads/raspbian/
Step 2. Use Etcher to place image on SD card:

This is a great tool recommended by raspberrypi.org.
 https://www.balena.io/etcher/

Prepare Pi

Step 1. Upgrade Pi:
$ sudo apt-get update
Step 2. Update packages:
$ sudo apt-get dist-upgrade

Installing Nodejs on Pi armv7+ (This will not work for armv6 Pi's)

Check your Pi version using:
$ uname -m
 Step 1.  Updates Debian apt package repository to include the NodeSource packages:
$ curl -sL https://deb.nodesource.com/setup_12.x | sudo -E bash -
Step 2. Install
 $ sudo apt install -y nodejs 
Step 3. Check node version
$ node -V

Installing node-HID on a Pi

Step 1. Install tools:
Linux (kernel 2.6+) :
  • Compilation tools: $ sudo apt install build-essential git
  • gcc-4.8+: $ sudo apt install gcc-4.8 g++-4.8 && export CXX=g++-4.8 (note: not sure how applicable this is)
  • libusb-1.0-0 w/headers: $ sudo apt install libusb-1.0-0 libusb-1.0-0-dev (note: possibly already installed)
  • libudev-dev: $ sudo apt install libudev-dev
 Step 2. Compile:
$ npm install node-hid --build-from-source
 Step 3. Move on to building/installing application

VoIPNorm