Project HDMI Switcher Part 4 - HDMI Switch and Final Thoughts

We are coming to end of this project and there are a few final adjustments to make to our HDMI switch. The HDMI switch for this project is the Atlona JUNO 451. This was the cheapest IP controllable switch I could find on Amazon. At just under $400 its not cheap but the alternatives were much closer to the $1000.

JUNO 451
Below are the settings we need to adjust on the switch. If you connecting a PC as one of the inputs ensure that HDCP is turned off. Also make sure to turn off the auto switch as this will now be controlled by our Touch 10.

Switch settings

One last thing to mention if you didn't notice in the previous post we are using HTTP and not HTTPS in control URL for our switch. This does mean enabling HTTP  on your codec. The JUNO switch didn't seem to support HTTPS. I guess a drawback of only being $400.
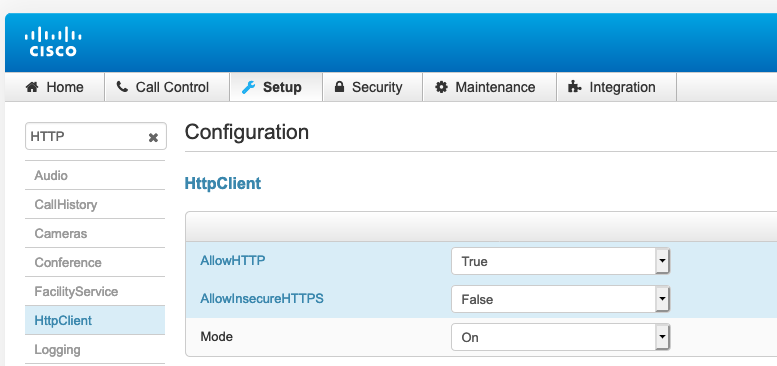
HTTP enable

Final Thoughts

This was a fun project and fairly easy. I could have covered it in one post but I think it's easier to consume a project over a number of posts and follow along. It is certainly much easier to write.

For the price the Atlona switch is awesome. One problem I ran into was the remote was dead on arrival. While I wasn't to concerned about it, it was a pain in testing that it didn't work. In saying that the project was a success and I use this setup in my home office.

The reason I decided to do project based posts on the blog is to help people find interesting stuff to build. Projects similar to the ones I have been blogging about need not be super intimidating as it first appears. There was really very little code to write and the UI on the Touch 10 was a simple panel with a few buttons.  There is a stark difference between coding sample hello world projects versus having things to build that provide actual value. You learn a great deal faster and and it is way more fun. Also these projects generally require a combination of hardware and software. Welcome to real life people, not every coding project is just a web server.

I hope your enjoying the recent project based posts I have been doing. There are loads more to come.

VoIPNorm

Previous post in the series:


Part 3 - The Macro

Project HDMI Switcher Part 3 - The Macro

This is really where the pedal hits the medal and we start pulling our solution together. But before we get started if you didn't catch the previous posts take a look here:

Part 1 - Introduction

http://voipnorm.blogspot.com/2019/08/project-hdmi-switcher-part-1.html

Part 2 - In-room control

https://voipnorm.blogspot.com/2019/08/project-hdmi-switcher-part-2-touch-10.html

The macro framework on CE based devices (Webex Room Kits and such) as you should hopefully know by now is javascript based. There are two main functions to our script. This first is listenToGui and the second is switchHDMI.  ListenToGui takes input via the events generated by the widgets on the Touch 10 which then calls switchHDMI to send the HTTP GET request to the HDMI Switch IP interface which then switches HDMI inputs. Once you look at the script below you will see just how simple it really is.

--Script--

Your URL if using a different HDMI switch will differ of course but should be documented by the manufacturer if the switch is IP controllable. In my case  the ${source}AVx1 on line 6 is just the id of the widget we created in the last post. By using simple id's to identify each of the inputs we are able to keep our code simple as the HDMI switch uses the same identification to assign input ports.

Next up HDMI switch setup and final thoughts.

VoIPNorm


Project HDMI Switcher Part 2 - Touch 10 Control

If you not familiar with the setup for this project please visit for the introduction.

In part 2 we are going to cover building the Cisco Touch 10 UI for controlling out HDMI switch. This is pretty easy as the UI control involves a button that is available in in and out of calls and the panel to allow selecting different inputs.

In-Room Control Primer

If you are not familiar with building custom interfaces on a Touch 10 controller please check out this primer from the Webex Team I posted recently first. It's a great intro for getting into working with the tools that allow you to create projects just like this one.

Back to the Project...


After accessing the In-Room Control Editor I created a panel and added a 4 button widget. Make sure to select the "Panel is Available Always". You may want to switch HDMI inputs mid-call.

In-Room Panel Creation
Once you have created your panel, select your icon and color for the panel button.
Button icon and color selection
We have our panel selected, our color and icon for the button, let us take a closer look at those widgets. As you can see below it's pretty simple. The ID's are aligned to the inputs on our HDMI switch so not to confuse us. To make it simple the button IDs are 1 - 4. The ID's are super important as this is what the Macros will use to identify what was pressed. Make sure to label the buttons on the widget with what the HDMI selections are.


Simple Button ID

What you end up with is something similar to the screenshots below on the Touch 10. Our switch has a purple button with something that looks switch-ish for the icon.

Button alway available

Widget with button labels

If you would like to upload this as XML here is the XML file you will need:


Next post, we will cover the Macro used to turn the UI into actions to control our Switch.

VoIPNorm

Project HDMI Switcher Part 1 - Introduction

Before the advent of custom UI elements and Macros on the Cisco Touch 10, switching HDMI inputs from a controller was typically done with another third party touch screen that was designed for addressing the room environment. This may or may not have included the video endpoint controls in the room.

Complex conference room
Your conference room may have also looked like the picture posted.  Hopefully you are not dealing with this type environment. Comment below if you are. I typically find organizations that have this type of conference room are struggling with understanding the new capabilities that modern video conference room device can do to reduce complexity.

The HDMI switch example in this post while only a small piece of a puzzle shows how you can start leveraging the Cisco video device in the room to reduce complexity. 

The Project


Below is an overview of what we are trying to achieve. 

Project overview
The Webex Room Kit we will be leveraging the following features:
  • Macros
  • Custom Touch 10 UI
  • HTTP request GET method
Atlona AT-JUNO-451
The HDMI switch for this project is a Atlona AT-JUNO-451 pictured right.  Its around $400 on Amazon and one of the cheapest HDMI switches that is IP controllable. Comment below if you have used other HDMI switches with success.

For our project we need to complete the following steps:
  1. Custom UI inputs on our Touch 10
  2. Codec Macro creation
  3. HDMI switch setup
In the next post we will tackle the custom Touch 10 UI controls to control our switch.

VoIPNorm

Creating Custom User Interfaces for Cisco Touch 10 for Webex Room Devices

One of the big differentiators for Webex Room devices is their ability to create custom experiences. Richard Bayes of Cisco does a great job of running you through one of the most common requests, creating a speed dial for support. This could be a speed dial for just about anything but support is a great use case.


VoIPNorm

Project Busylight Part 3 - Final Thoughts

The final step to completing this project was to get it running on a Raspberry Pi. You may have noticed a few weeks ago I posted some instructions on getting Nodejs and Node-hid running on Raspberry Pi. Well, now you know the reason why :)

Busylight in action. Vader finally found an available conference room.
One of the settings you may need to adjust on your Webex Room Device is PeopleCountOutOfCall. If you wish to show presence of people in the room regardless if they are using your room systems this will need to be enabled. It is a sensitive setting though and if only one person is the room and the camera does not see a face front on it will report 0 people in the room. I have place some code for people presence detection but right now its not changing the color of the light. Some more experimenting is required to see if this works better than people count.

Webex Room Kit setting for People Count out of call:

Project files can be found here: https://github.com/voipnorm/CEbusyLightOmega

Final Thoughts

Another project done. This has been a fun one. The Busylight is a fun low cost project that can get you started with developing with Cisco Video Endpoints and it has potential for huddle spaces with Webex Room Kits. I also set a up Busylight Alpha which is a slightly different device but works with the code I developed with the Omega.

The BL Omega device is a great little light device. Very similar in a lot of ways a the Embrava device but I found the tech and developer support from Plenom a much higher standard. Seems to me Embrava have little interest in developers, which is a shame. This leads me to recommend the Busylight for custom development projects more so than the Embrava product.

The Busylight took next to no time to get up and running with some initial code on my MAC, using a Pi always takes a bit more time. Thanks to the libraries already available on Github it really is a simple project that you could integrate into all sorts of stuff. Don't believe me, then go check it out.

Next project, HDMI switch integration with a webex board. Should be fun.

VoIPNorm

Previous project posts:

Part 1
http://voipnorm.blogspot.com/2019/08/project-busylight-part-1-setup.html

Part 2
http://voipnorm.blogspot.com/2019/08/project-busylight-part-2-nodejs-code.html

Project Busylight Part 2 - Nodejs Code

The adventure continues. This fun little project now has some Javascript running on nodejs and seems to function pretty flawlessly.

I now have four different presence states based on feedback from the Room Kit:
  1. Flashing Red - Do not disturb
  2. Red - On a Call
  3. Blue - Room occupied based on people count
  4. Green - available and empty
The expansion of different presence states was pretty easy. I incorporated people count, do not disturb and the call API's. Do not disturb is a little hard to find on a Cisco Touch 10 so my advice is if you want users to actually use DnD or know its available build a custom UI widget for it. This can be used to toggle DnD via a Macro.

The project was a little larger than expected so I created a github repository to get access to code if your interested.

https://github.com/voipnorm/CEbusyLightOmega

The design is pretty simple. The bl and endpoint files create class's for what you would think they are. The most interesting part of this project was creating a way to prioritise each presence state. What I created is based on the array index of a 4 element array [0,0,0,1]. Each presence state matches the following positions in the array:
  • Flashing Red (DnD) - 0
  • Red (in call) - 1
  • Blue (people present) - 2
  • Green (room is vacant) - 3
As the presence state changes so does the array. [1,0,1,1] means the room has been set to do not disturb and there are people in the room. The busylight shows a flashing red because it has the highest priority. The final element is alway left at 1 because it has the lowest priority default and it's not worth the effort to change. The "let indexColor = colorArray.indexOf(1);" looks up the first element in the array that has been set to 1 dictating what color to set the light.

Next step lets get it running on a Raspberry PI.

VoIPNorm

Project Busylight Part 1 - Setup

It is project time again. This time I am working on a very similar project as the recent Embrava BlyncLight project but using the Kuando Busylight Omega by Plenom. The folks over at Plenom have a great test program to get a Busylight sample to test out for free. For this project I am using the Omega Busylight pictured down below.

Initial Thoughts and Comparisons

Both products, the BlyncLight and Busylight, are similar but there are enough differences to allow you to distinguish the two products pretty easily. One thing I first noticed about the Busylight is that it's not a bright as the BlyncLight. It is more toned down due to the white casing it has. This is not a bad thing though as the BlyncLight could be considered to bright in some environments where the Busylight is less visually disruptive.


Plenom have been receptive to developers writing code to their product. While it was difficult to get Embravas help, Plenom have been phenomenal in helping me get setup with the right info and also releasing the USB API to help develop a node module. In my first take on the project though I am using a library from another developer but with the USB API it should be pretty easy to write my own. In typical nodejs style it is always easier to use something that is already out there first time around.

The busylight nodejs module install also requires node-hid. If you plan to use node-hid on a Raspberry Pi here are some useful instructions to get that running.

Here is a quick overview of the setup:


If you followed along on my previous project this probably seems all to familiar. So, along with using nodejs this time around instead of Python, to spice it up a bit more I am going to add some additional functions like recognising people count to turn the light purple. Now my wife will know I am in the office but not on a call. I am sure she will be impressed. Well, probably not.

Make sure to stick with me this should be a fun little project.

VoIPNorm